
Introduction to Sourdough Sandwich Bread
If you’re a fan of baking or just love a soft, fluffy loaf for your sandwiches, then this sourdough sandwich bread recipe is your new best friend. There’s something magical about the tangy flavor that only a sourdough bread can bring, combined with a tender crumb that’s just right for stacking your favorite fillings. Unlike regular bread, sourdough uses a naturally fermented sourdough starter which enhances its flavor and texture in a way that commercial yeast can’t match. Curious to know more about the unique qualities of sourdough bread? Check out this detailed starter preparation to get started.
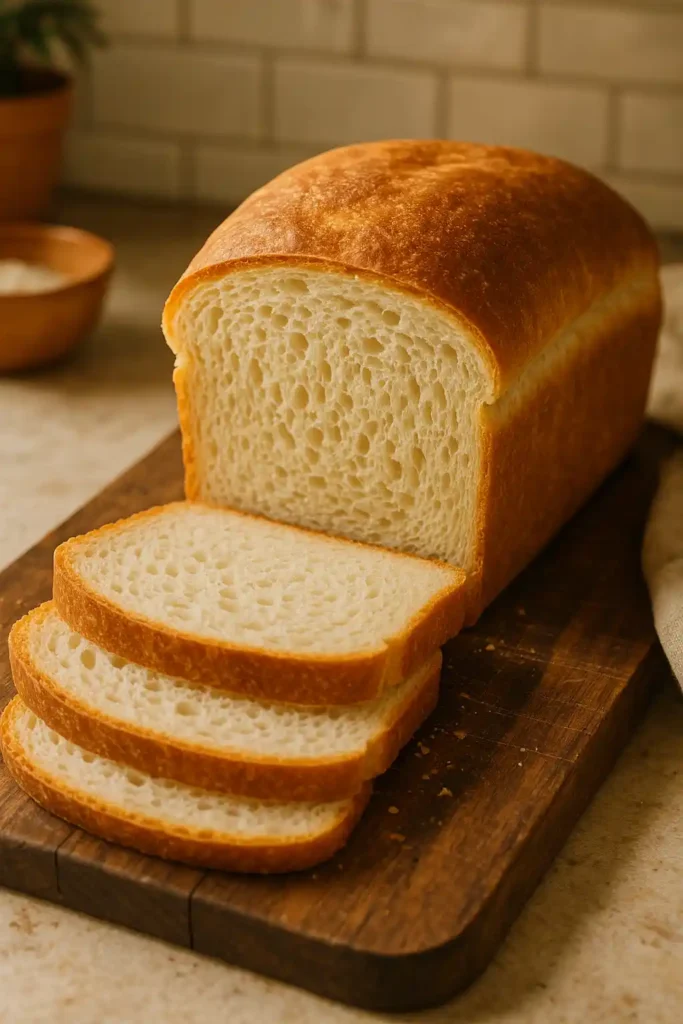
What Makes Sourdough Sandwich Bread Unique?
What truly sets sourdough sandwich bread apart is the interplay between its natural fermentation and the resulting complex sourdough flavor. This fermentation process not only improves the bread’s taste but also the texture, giving it a soft yet sturdy crumb perfect for sandwiches. Plus, its slight tanginess complements savory or sweet sandwich fillings fantastically. Plus, the bread’s natural leavening process leads to better digestion, making it a favorite for many home bakers. Curious about how you can develop the perfect dough? Dive into bread dough fermentation tips to learn more.
Benefits of Making Your Own Sandwich Bread
Making your own sandwich bread means you’re in full control of ingredients and flavors. This homemade sourdough bread not only tastes fresher but is free from preservatives and additives that store-bought loaves often contain. Plus, it’s incredibly satisfying to pull a warm, golden loaf from your oven — talk about kitchen therapy! Homemade bread lasts longer too when stored and cooled properly, so you’re saving money while indulging in quality. It’s also a great conversation starter; people love knowing you baked it yourself. Want to learn how to achieve a delicate crumb texture in your bread? Here’s a helpful guide on a soft, fluffy loaf.
Ingredients for Sourdough Sandwich Bread
For this sourdough sandwich bread recipe, understanding your ingredients is key. Each one plays a vital role to create a loaf that’s as beautiful as it is delicious. From the tangy sourdough starter to the moisture-rich milk or butter, every component contributes to that soft crumb and crispy crust.
Essential Ingredients and Their Roles
Here’s what you’ll need:
- Active sourdough starter: The heart of your bread providing natural leavening and sour flavor.
- All-purpose flour: The building block, providing gluten for dough structure.
- Water: Hydrates the flour, affects dough hydration level, and influences the crumb.
- Salt: Enhances flavor and regulates fermentation.
- Milk and butter (optional): Add softness and tenderize the crumb.
Each ingredient’s quality affects the outcome, so stick with fresh and organic options when possible. Understanding this mix is like assembling your bread’s dream team. For extra tips on bread dough elasticity and ingredient roles, dive into homemade sandwich bread recipe.
Ingredient Variations and Substitutions
Got dietary restrictions or want to experiment? No problem! Swap all-purpose flour with whole wheat for a nuttier taste or try bread flour for a chewier bite. Milk can be replaced with non-dairy options, and butter with oils if you need a vegan twist. Just remember, these changes can tweak your bread’s hydration and texture, so keep an eye on the dough consistency. If you’re curious about altering your recipe without losing that perfect softness, check out these delicate crumb texture tips.
Step-by-Step Sourdough Sandwich Bread Recipe
Making sourdough sandwich bread is a rewarding process that combines patience with technique. Ready to roll up your sleeves? Here’s your ultimate guide to creating that perfect loaf at home.
Preparing the Starter and Mixing the Dough
Start with a bubbly and active sourdough starter. If you’re new to this, check out the homemade starter basics for creating a sourdough starter that sings. Measure your starter and mix it with water and flour, ensuring it’s bubbly and smelling pleasantly tangy.
Next, add the flour, salt, and optional milk or butter. Mix until all ingredients form a shaggy dough. This initial step might feel messy, but it’s the foundation of your sourdough sandwich loaf.

Kneading Techniques for Perfect Dough
Kneading here is more than just mixing; it develops the gluten network that gives your bread strength and elasticity. Use the classic stretch-and-fold method or traditional kneading on a floured surface. Your goal? A dough that’s springy and smooth — not sticky or dry. If you want to see how to test gluten development, have a look at this windowpane test explained.
Bulk Fermentation: Timing and Environment
Allow your dough to rest and rise during the bulk fermentation stage. This process takes time — sometimes several hours — but it’s where your bread gains flavor and structure. The environment matters: keep it warm (around 75°F), cozy, but not too hot. Check out this comprehensive bulk fermentation insights to optimize this crucial phase.
Shaping the Dough and Preparing Loaf Pans
Once bulk fermentation is complete, shape your dough into a tight loaf. Use your hands to create surface tension by folding the dough over itself. Prepare your bread loaf pan by greasing it lightly or lining with parchment paper so the dough releases easily after baking. The art of bread shaping ensures even baking and an attractive final shape.
Second Rise and Baking Instructions
Place your shaped dough in the loaf pan for the second rise, letting it puff until nearly doubling in size. Preheat your oven to 375°F for that ideal bread baking temperature.
Optional: brush the top with an egg wash to create a golden crust. Bake until the loaf sounds hollow when tapped and the crust is crispy but not hard. For tips on crust perfection, check out the egg wash bread crust techniques.
Troubleshooting Common Issues
Every baker hits snags; here’s how to tackle common problems with your sourdough sandwich bread recipe.
Dough Too Sticky or Dry
If your dough is too sticky, it might need more flour or longer kneading to build gluten strength. Conversely, if it feels dry or cracks, add a splash of water during mixing. Balance is key to achieving the right bread dough consistency.
Bread Doesn’t Rise Properly
Low rise usually means your sourdough starter isn’t active enough or fermentation time/temperature was insufficient. Use a bubbly starter and ensure your kitchen is warm enough. Revisit optimizing dough rise phase for guidance.
Crust Too Hard or Too Soft
If your crust turns out overly hard, you might be baking too long or at too high a temperature. For a softer crust, try brushing with butter after baking or reducing oven time. Remember, a nice crust balances crunch and chewiness.
Tips for Perfect Sourdough Sandwich Bread
Want to wow with every loaf? Here are some pro tips to nail your sourdough sandwich bread recipe every time.
Using the Windowpane Test
The windowpane test is a game-changer for checking gluten development in your dough. Take a small piece and gently stretch it — if it forms a thin, translucent membrane without tearing, your dough is ready to move on. Learn more about this gluten development method.
Cooling and Storing Your Bread
Patience here pays off. Cool your loaf completely on a wire rack to prevent sogginess from steam. For storage, keep your bread in a breathable bag at room temperature for a few days. More about the best bread cooling methods help here.
Enhancements: Butter, Milk, and Sweeteners
Adding butter or milk softens the crumb, while slight sweeteners like honey boost browning and depth of flavor. Experiment to customize your loaf.
Serving Suggestions and Uses
Your fresh sourdough sandwich bread deserves the perfect pairing.
Best Sandwich Pairings
From classic ham and cheese to vibrant veggie stacks, the tender crumb and subtle tang of this bread elevate your sandwich game. Fancy a nutritious twist? Check out these nutritious morning meal ideas for inspiration, or explore delicious pairings for your dish to diversify your menu.
Toasting and Other Uses
Toast slices for breakfast or afternoon tea — it crisps up beautifully! Use it for grilled cheese, bruschetta, or even to mop up soups and sauces for a hearty meal.
Storing and Freezing Sourdough Sandwich Bread
Keep your homemade creation fresh and ready whenever hunger strikes.
How to Store Bread for Freshness
Store your loaf wrapped in a cotton or linen bread bag at room temperature to maintain crust texture while keeping the crumb moist. Avoid plastic bags unless freezing as they trap moisture.
Freezing and Thawing Tips
Slice your bread before freezing so you can grab slices without thawing the whole loaf. Wrap tightly in plastic wrap and a freezer bag. When ready to eat, thaw at room temperature or toast slices directly. For more, read freezing and storing bread guidelines.
FAQs
What ingredients do I need to make sourdough sandwich bread?
You’ll need an active sourdough starter, all-purpose flour, water, salt, and optionally milk and butter for a softer crumb. Each ingredient plays a role in the bread’s structure and flavor, so quality is important. You can substitute whole wheat flour or non-dairy milk to suit your preferences.
How long does it take to make sourdough sandwich bread?
The process typically spans 12 to 24 hours, largely due to fermentation times. After mixing and kneading, the dough requires bulk fermentation and a second rise before baking. The actual bake time is around 30-45 minutes at 375°F.
Can I use an inactive sourdough starter for this recipe?
An inactive starter won’t provide enough leavening or flavor. It’s vital to use a bubbly, active starter that passes the float test and smells tangy. Refresh your starter 4-6 hours before baking to ensure it’s lively.
How do I know when the dough is ready to bake?
Perform the windowpane test to check gluten development and watch for your dough to nearly double in size during the second rise. Also, the dough should slowly bounce back when gently poked.
What is the best way to store sourdough sandwich bread?
Store it in a breathable bag at room temperature for up to three days, or freeze slices tightly wrapped to maintain freshness longer. Avoid plastic if you want a crispy crust.
Conclusion
Making your own sourdough sandwich bread is both an art and a joy that yields a soft, flavorful loaf perfect for everyday use. By following the detailed steps of mixing, kneading, fermenting, shaping, and baking, you can master this artisanal bread. Remember to adjust hydration levels, use an active starter, and allow adequate rising times to capture that iconic sourdough flavor and bread crumb texture. Proper cooling and storage methods are essential to extend freshness and texture. Whether you’re crafting an epic sandwich or indulging in toasted slices, homemade sourdough sandwich bread adds outstanding quality and taste to your meals.
3 thoughts on “Sourdough Sandwich Bread Recipe: Soft, Tender & Perfect Loaf”